Go语言单元测试入门
单元测试的定义
每次提到“单元测试”,容易跟“集成测试”混淆,如果确定要推广“单元测试”,首先一定明确“单元测试”的目的和边界。下面是一段StackOverflow上针对两者之间差别的英文描述仅供参考:
The difference between unit and integration tests is that unit tests usually isolate dependencies that communicate with network, disk etc. Unit tests normally test only one thing such as a function.
官方自带的测试姿势
Go语言之所以令人感到欣喜,很大的一个原因是那些设计者们已经为广大的开发者做好了很多轮子,包括测试框架,试问自带测试框架的编程语言有几个。
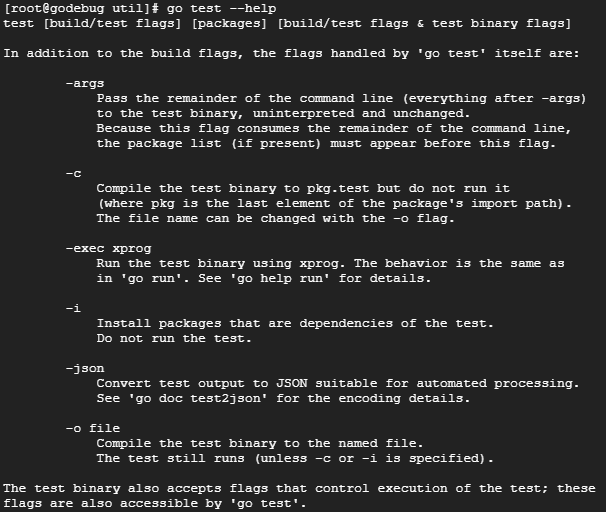
官方提供了testing包作为测试框架(官网地址),并提供了go test相关命令作为测试入口:
我们将通过一个例子看看官方自带测试框架的价值,这个例子取自LeetCode上的一个esay problem——Two Sum,下面是用Go语言实现的解法(感兴趣的可以关注这里:https://github.com/nevermosby/golang-leetcode ):
func twoSum(nums []int, target int) []int {
	mapv := make(map[int]int)
	for i, v := range nums {
		if val, ok := mapv[target-v]; ok {
			return []int{i, val}
		}
		mapv[v] = i
	}
	return nil
}
如果要为“TwoSum”这个方法写单元测试用例,一般可以这样写:
import (
	"testing"
	"reflect"
)

func TestTwoSum(t *testing.T) {
	tc := []int{1, 2, 3, 4}
	target := 5
	expected := []int{2, 1}
	got := TwoSum(tc, target)

// because slice type can only be compared to nil via ==
// use DeepEqual instead, it does check the length and each elements of two slice array
// you can find details via source code or here(https://gist.github.com/nevermosby/d373dfc07335c51477087f0f544e3b7c).
	if !reflect.DeepEqual(got, expected) {
		t.Errorf("TwoSum(%v, %v) = %v, expect %v", tc, target,got, expected)
	}
}
通过go test命令,执行这个单元测试,结果令人满意:

注意到,这里使用两个执行参数,以获取更多信息:
- -v,老司机肯定懂,通过添加verbose参数,输出更多信息,这里如果你的单元测试里使用Log或Logf,就会全量输出相关信息
- -cover,大家也能猜出一二,顾名思义,就是开启测试覆盖率分析,即在测试执行完毕后同时输出该单元测试可以覆盖源代码行数的比例
当然还有更多的执行参数,比如-timeout(指定测试用例执行时间上限,默认是10分钟)等等,大家按需自取。
小结我们这个例子,有以下特点:
- 单元测试文件是以*_test.go命名
- 测试函数是以Test作为命名前缀
- 测试函数的入参是*testing.T
- 单元测试文件没有main函数
- 对单个测试文件执行测试
前3个特点其实是成套的,因为Go语言支持3种类型的测试函数:
- 普通测试函数(Test)
- 基准测试函数(Benchmark)
- 示例函数(Example)
上文的例子用的都是普通测试函数,用于测试程序的逻辑行为是否符合期待。基准测试用起来就是性能测试,它的本质是多次运行目标测试函数以计算一个平均的执行时间。示例函数其实很简单,严格意义上说它不是一个测试函数, 既没有入参也没有返回值 ,主要通过标准输出,形成一个示例文档,感兴趣的童鞋可以戳这里。
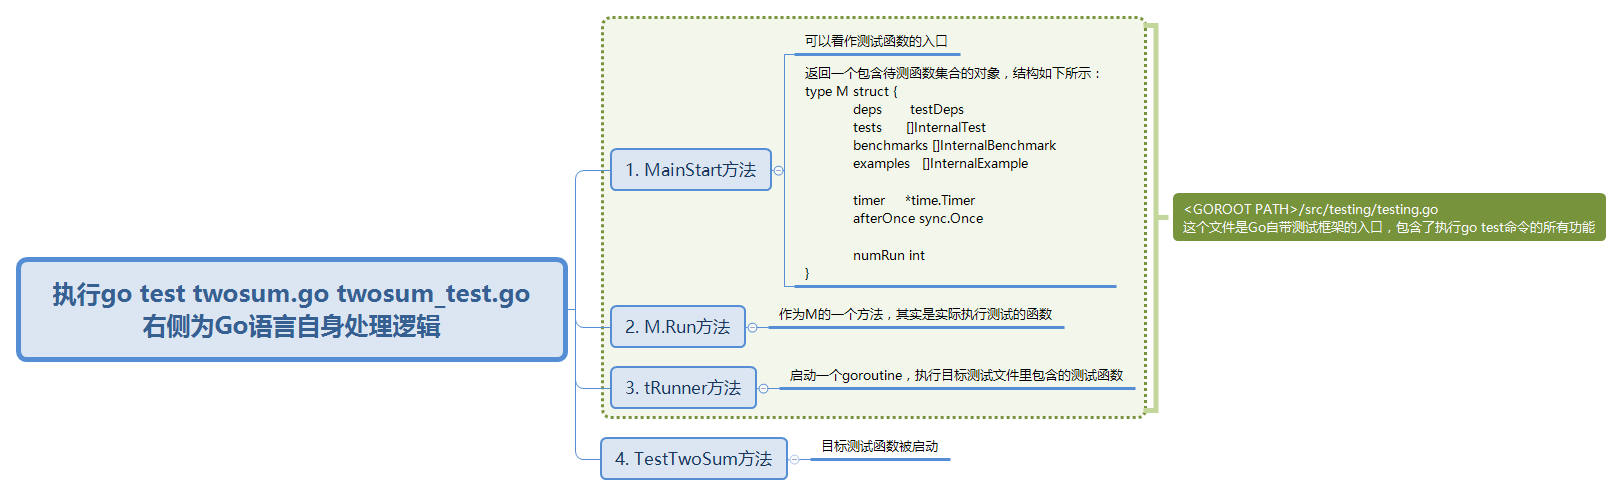
第4点,是个有趣的话题。很多语言的单元测试文件都是没有显性声明main函数的。借此机会,花了点时间,针对Go语言提供的Testing包,简单研究了下go test背后的工作机制,以下思维导图供大家参考:
第5点,go test命令支持对单个测试函数、单个测试文件、单个package以及整个项目的不同范围,执行相关测试。通过配置自动化脚本,可以具有相当高的灵活度。
个人推荐的测试姿势——表格驱动
注意到上面的例子只用了一组测试数据,可以想象,正经做单元测试,一定会有很多组测试数据。Go官方也想到了这点,提出了subtest概念,以下是个样例:
func TestFoo(t *testing.T) {
     // setup code
     t.Run("A=1", func(t *testing.T) { … })
     t.Run("A=2", func(t *testing.T) { … })
     t.Run("B=1", func(t *testing.T) { … })
     // teardown code
 }
每一个t.Run函数都执行一组测试数据,这样做的好处是,原来需要为不同的测试数据定义多个测试函数,现在可以在一个测试函数中完成,并且可以复用setup和teardown逻辑。其实这就是table-driven test methodology——表格驱动测试方法论的雏形。它的典型模板是这样的:
func TestFoo(t *testing.T) {
     // define test data by table
     testData := []struct {
         caseName string
         input    string
         want     bool
     }{
         {"if-A","A",true},
         {"if-B","B",true},
         {"if-A&B","AB",false},
         {"if-C","C",false},
      }
      for _, test := range testData {
          t.Run(test.name, func(t *testing.T){
              if got := Foo(test.input); got != test.want {
                  t.Errorf("Foo(%v) = %v, expect %v", test.input ,got, want)
              }
          })
      }
}
如果希望基于精心挑选测试数据,来构造自己的测试用例,表格驱动测试方法就是你最合适的选择。但手写这么多单元测试一定不是开发者们希望看到的,好消息是,有轮子了~
由于表格驱动测试在Go语言开发过程中经常被使用,社区也出现了自动生成表格驱动测试函数的工具,比如gotests,它能帮助开发者自动生成基于表格驱动测试方法的测试代码,参见它的README:
gotestsmakes writing Go tests easy. It’s a Golang commandline tool that generates table driven tests based on its target source files’ function and method signatures. Any new dependencies in the test files are automatically imported.
使用gotests命令,为例子中的TwoSum方法自动生成测试代码:
# Firstly, create the target test file
# Otherwise "gotests" will throw errors for "no such file or directory"
> touch twosum_test.go
# "-all" means to generate go tests for all functions and methods in target file
# "-w" means to write output to files instead of stdout
> gotests -all -w twosum_test.go twosum.go
> Generated TestTwoSum
看看生成出来的效果:
import (
        "reflect"
        "testing"
)

func TestTwoSum(t *testing.T) {
        type args struct {
                nums   []int
                target int
        }
        tests := []struct {
                name string
                args args
                want []int
        }{
                // TODO: Add test cases.
        }
        for _, tt := range tests {
                t.Run(tt.name, func(t *testing.T) {
                        if got := TwoSum(tt.args.nums, tt.args.target); !reflect.DeepEqual(got, tt.want) {
                                t.Errorf("TwoSum() = %v, want %v", got, tt.want)
                        }
                })
        }
}
生成的代码除了需要开发者自己填写实际测试数据之外,可以说是相当完整了,特别令人惊叹是它自动引入了reflect这个包来做slice类型的值比较,有点小智能了。
推荐给喜欢命令行自动化的童鞋入坑。
当然作为IDE界白富美——Goland也是可以自动生成测试函数的,使用快捷键
Alt+Insert 可以选择生成函数的类型,但内容上只是一个模板,比gotests生成的要简单很多,参见以下操作视频:
https://www.youtube.com/watch?v=e5vM-qs-TkQ
总结, 使用gotests命令或IDE自动生成单元测试代码,其实主要适用于工具类方法自动生成代码,而那些具有第三方依赖服务的方法,可能就不怎么适用了。
今天作为入门篇内容有点多,下次中阶篇内容,让我们一起聊聊Go语言的Mock和Stub。
棒棒的